Protea Wooster Coat Hack

How I turned the Sewing and the City Wooster Jacket into a quilted reversible coat.
Step 1: Pattern changes
I wanted the pockets to be lower and the coat to be longer, so I added 2 inches in length to the back piece, the front middle pieces, and the neckline piece.
Step 2: Cutting for the front:
I cut the back and front middle pieces from the Protea 1 Giant Flower Panel.

The Protea 1 Giant Flower panel.
I cut the sleeves, pockets, bottom front, and back yoke pieces from plain purple cotton poplin that matched the protea. I cut the neckline and cuffs from the Protea 2 Giant Flower panel XL size. (More on this later)

The Protea 2 Giant Flower panel
Step 3: Sewing the front together:
I followed the Wooster instructions to sew the front of the jacket together, then laid it out flat on a piece of batting to prepare to quilt.

Step 4: Sashiko Embellishment
Here’s where my mom got involved. She wanted to make it a coat we would both share and cherish forever.

My mom getting started on the hand stitching.

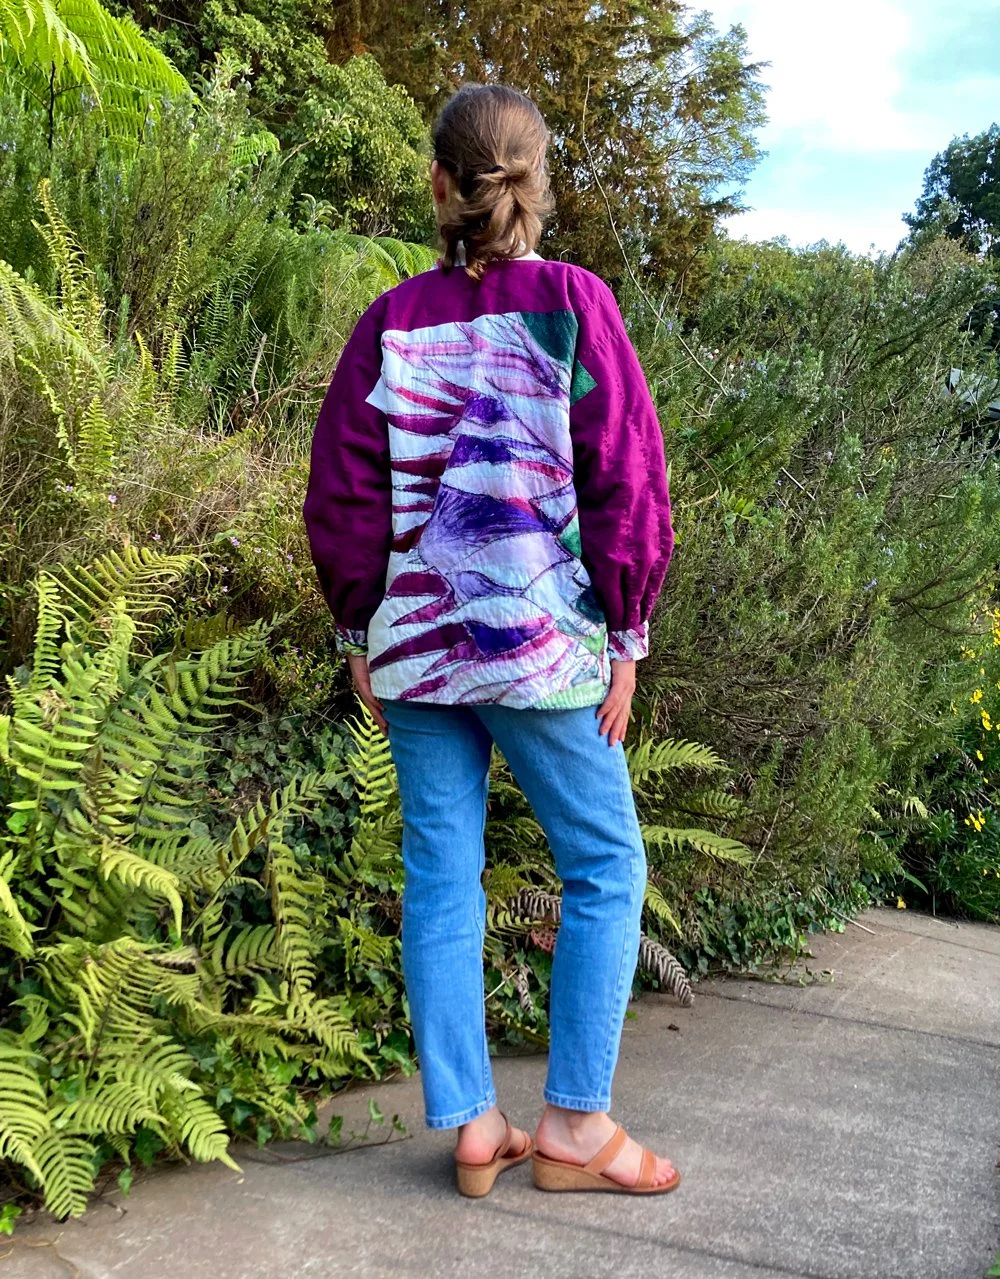
She did hand stitches all around the flower petals on the back to accentuate the painting.

My mom also did stitching around the leaves and the stem on the front and vertical lines below the leaves.

She then did stripes of purple stitching on the yoke and sleeves using purple embroidery floss.
Step 5: Cut out batting and lining
Once all the hand stitching was done, which attached the outer jacket to the batting, I cut the batting out and then traced it onto my lining fabric: cotton double gauze Protea Watercolor Textile. I cut out the front and back lining as one big piece, and then cut out the lining sleeves separately and sewed them on. (I did this to be more economical with the fabric)


Step 6: Assembling the coat
I sewed the lining to the outer coat at the back hem, right sides together. I repeated this for the hems of the right and left fronts.
Right sides together, I sewed the side seams of the lining together separately from the side seams of the outer coat.
Then I fit the sewn up lining into the sewn up outer coat and basted the neckline and sleeves together to hold it in preparation for the cuffs and neckline.
Step 7: Cut Neckline and Cuffs and Embellish them
I cut the neckline and cuffs out of the Protea 2 Giant Flower Panel. (Remember: I cut the neck 2 inches longer than the pattern piece because I had lengthened the coat 2 inches.) My mom hand stitched the cuffs and neck too.


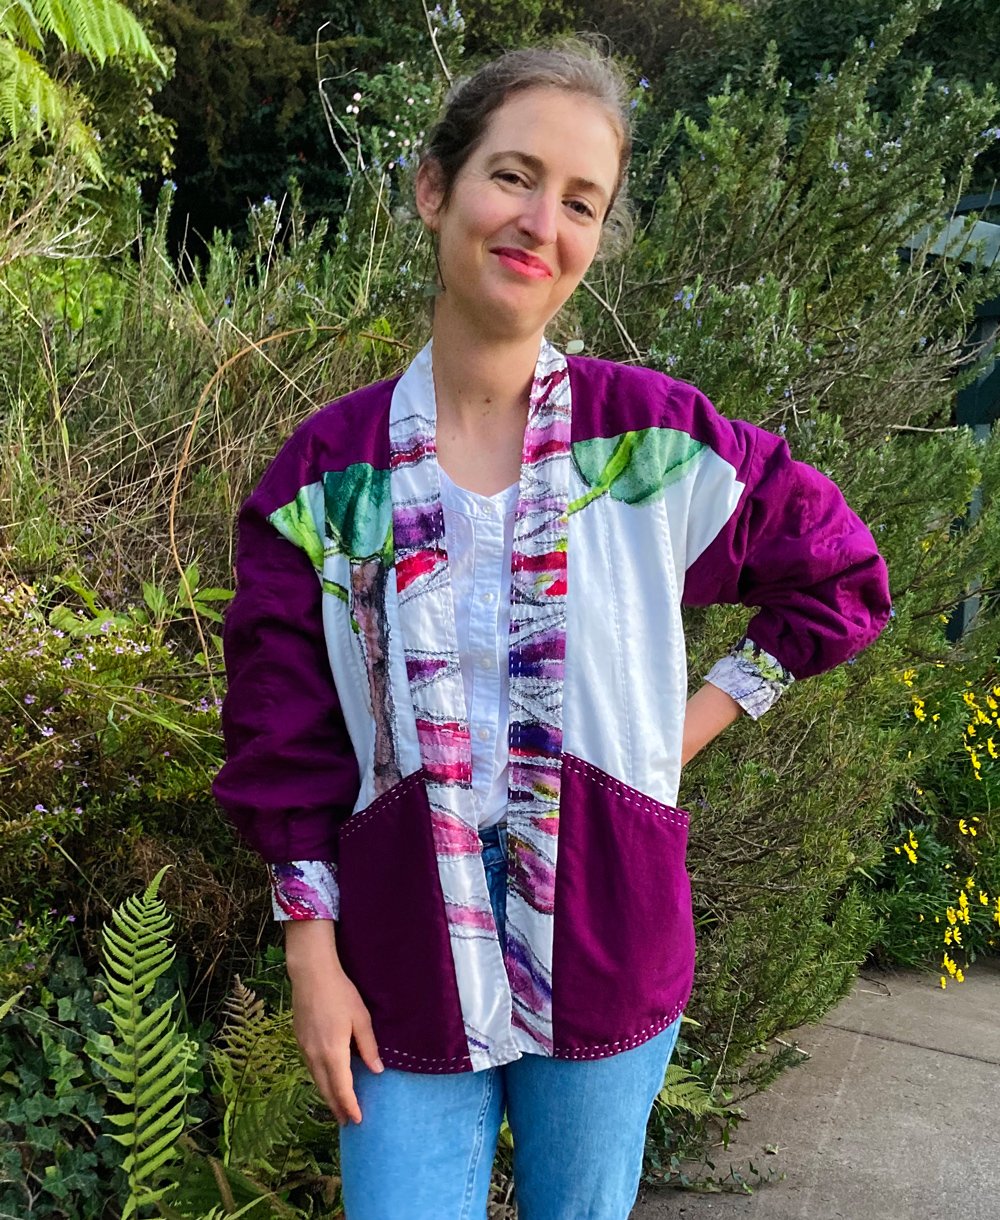
Detail of the sashiko hand stitching that embellishes the neck and cuffs!
Step 8: Cuff Pleats.
Inspired by @michellewalters1024 quilted coat she made with my Pink Bouquet Jubilee fabric (below), I decided to pleats the cuffs.

Self drafted coat by Michelle Walters using the Pink Bouquet Jubilee cotton poplin.

Step 9: Finishing Touches
I attached the cuffs and neckline to the coat and for a final touch my mom added a few more lines of sashiko stitching to the hem, neckline, and pocket openings.

Finished cuffs and neckline.

Finished front.

Finished back.
Step 10: ENJOY!


My amazing mom rocking the jacket!
Special thanks to Christine Lindebak, pattern designer of Sewing and the City for letting me test the Wooster Jacket and featuring me on her blog! Check out her many amazing patterns and be sure to follow her here.